Leathercrafts Most Annoying Problem. Sorted, With 1 Simple Thread Hack
- Leathercraft Masterclass

- May 19, 2023
- 3 min read
Have you ever tried using thick thread but noticed how it can be a pain the the butt to push through a standard sized needle?
Using a 3.85mm pricking iron or larger for cases, handles and large leather goods, really requires a thread 0.6mm or higher to produce something truly durable and long lasting.
So, why would you want to use a smaller or standard size needle with thick thread anyway? I'll explain in just a moment.
If you prefer to watch the video vs read the blog, press play below:
In this blog, I'll show you how to get thick thread through a small needle, which also works if you ever struggle with threading needles in general. This can be due to eyesight, or manual dexterity issues.

Mostly, you want to use the smallest needle possible when saddle stitching. This makes it much easier to stitch several layers of leather. However, large thick needles can be a real pain to pull through, and frequently requires the use of pliers.
Larger needles are generally thicker as well as longer, so when you combine a thick needle with thick thread, it's going to make sewing a seam quite challenging. Especially if you don’t use an awl, or your awl blade is too small.
A large John James 002 needle is great, but you're going to need large holes on your leather to use it. It's rare I ever need to use these.
The John James 004 needle is more common, so that’s what I’m going to demonstrate using in this post.
Now, I’m also using Fil Au Chinois 332 linen thread here, and after waxing, it measures around 0.75 millimetres, which is larger than the hole in the eye of the needle (note: the techniques used here also work with polyester thread too).
So, how are we going to get it in there? Because right now, it would be next to impossible.
There are two methods. Firstly, is the traditional way which I'll discuss now.
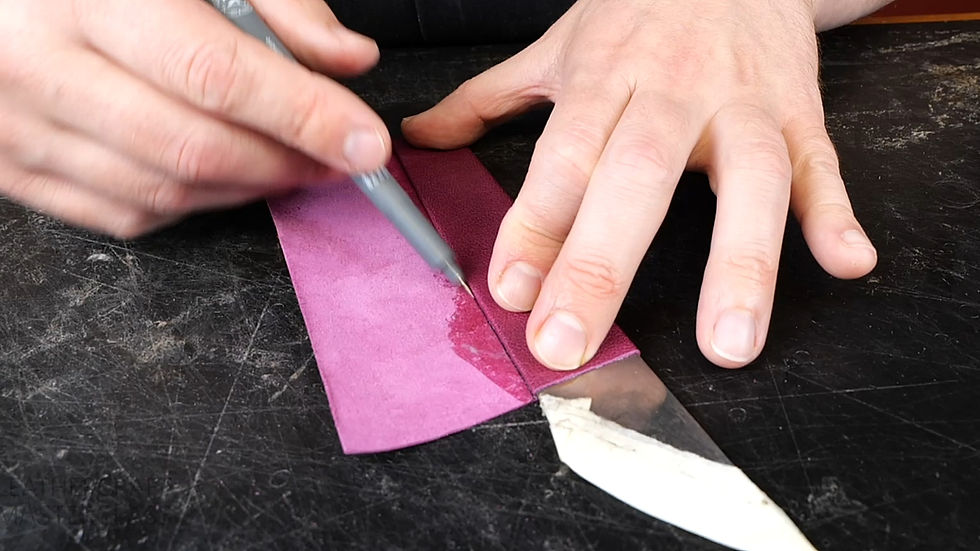
Take your thread and taper it down towards the end. To do this, grab a sharp knife and start by removing the very end at a shallow angle, tapering it down to just a few fibers.


Now you can create a smoother taper by going back a little bit further and starting the scraping method.
Take your blade, not quite 90 upright, with the back of the knife facing slightly forward. Lightly draw the knife along the taper so you start to build up some fluff.


At this point, it obviously won't fit through a needle, so we're going to take a piece of beeswax, and pull it across our thread a few times to stiffen the end. What we're looking for is a fine tapered point.


Once you've got that, you can remove the very end of the 'tail' by cutting off the tip. This will clean up any small fibres that will catch in the eye of your needle.

Now you can take your needle, push your thread through, and once you're onto the un-tapered part of the thread, you can then turn it over and start locking your needle into place as normal.

So that's the traditional method for threading a needle.
Now, let's explore another method that may be quicker, and simpler for you to do.
The easiest method I've found, is to forgo the knife and just take a hammer. It doesn't have to be a polished hammer. Just hold the end of your thread against the table, then take the corner of your hammer and tap the very tip flat.

With your flattened end, place the corner of it into the eye of the needle, then lift up at the same time while pushing through.


This is a much quicker method and requires a little less skill than tapering using your knife, plus you'll get the exact same result.
So, which method you use is really up to you. I use second method because it takes less time.
Click HERE to discover more about the video courses.
If you haven't already, don't forget to grab your FREE copy of my short saddle stitching tutorial.
Click HERE now, and get your FREE copy instantly sent to your inbox. Then grab yourself a coffee and let's get started!

I just bite the tip of the cut thread with my front teeth to get the same flattened (and moistened, I might add) tip that makes it easy to thread through a needle.