Leathercraft Photography. I Reveal My Method For The 1st Time
- Leathercraft Masterclass

- Oct 12, 2025
- 7 min read
Much like you, I’m a leathercrafter first and foremost. However, unless you work for a company producing leather goods, your role goes beyond craftsmanship alone.
As a modern self-employed leatherworker, this non-traditional role means I must wear many hats. One of them being the role of a photographer.
If you’re proud of your leatherwork, remember: no one will promote it unless you do. Most of the time, exposure to our work comes from online images, through social media, a website, email or magazines.
This post isn’t written by a professional photographer, nor is it intended for one. It's for crafters like you and me who just want to create great photos of our leather projects with what we have available.
So with that in mind, you won't see me going on about aperture, ISO, shutter speed or using RAW files. We just need the basic knowledge.
And for this, the best camera is the one you already have. Even if that's just a smartphone. There you go, that's all of my camera advice done already!
It doesn’t matter if you don’t currently sell your work, or even have any intention to. Having an archive of your work online is great to look back on. it's perfect to track your progress as the months and years progress.
Honestly, receiving compliments and acknowledgment for your hard work is worth it alone. After all, we're all human. We create work with our heart and soul.
So in this blog, I’ll break down the essentials of leathercraft photography, including:
Setting the scene
Using props
The importance of lighting
The power of storytelling
And editing your masterpiece
Setting the scene.
In photography, there’s a saying. You don’t take a photo, you make a photo.
This means, you don’t just place your work on a clear table, point a camera at it and press the shutter.
This might work if you’re trying to sell an old jacket on eBay, but if you’ve taken many hours painstakingly creating your leather items, try and put in a little more thought to setting the scene to get better results.
What is the colour of your item? Could other objects of the same colour, or even contrasting colours be placed in the photo to make your work pop?

The example images below show the same stingray skin. One photo uses items of a similar colour within the image, whereas the other uses colours from the other side of the spectrum to make it stand out. Playing around will help you decide which works best for you.


Using props.
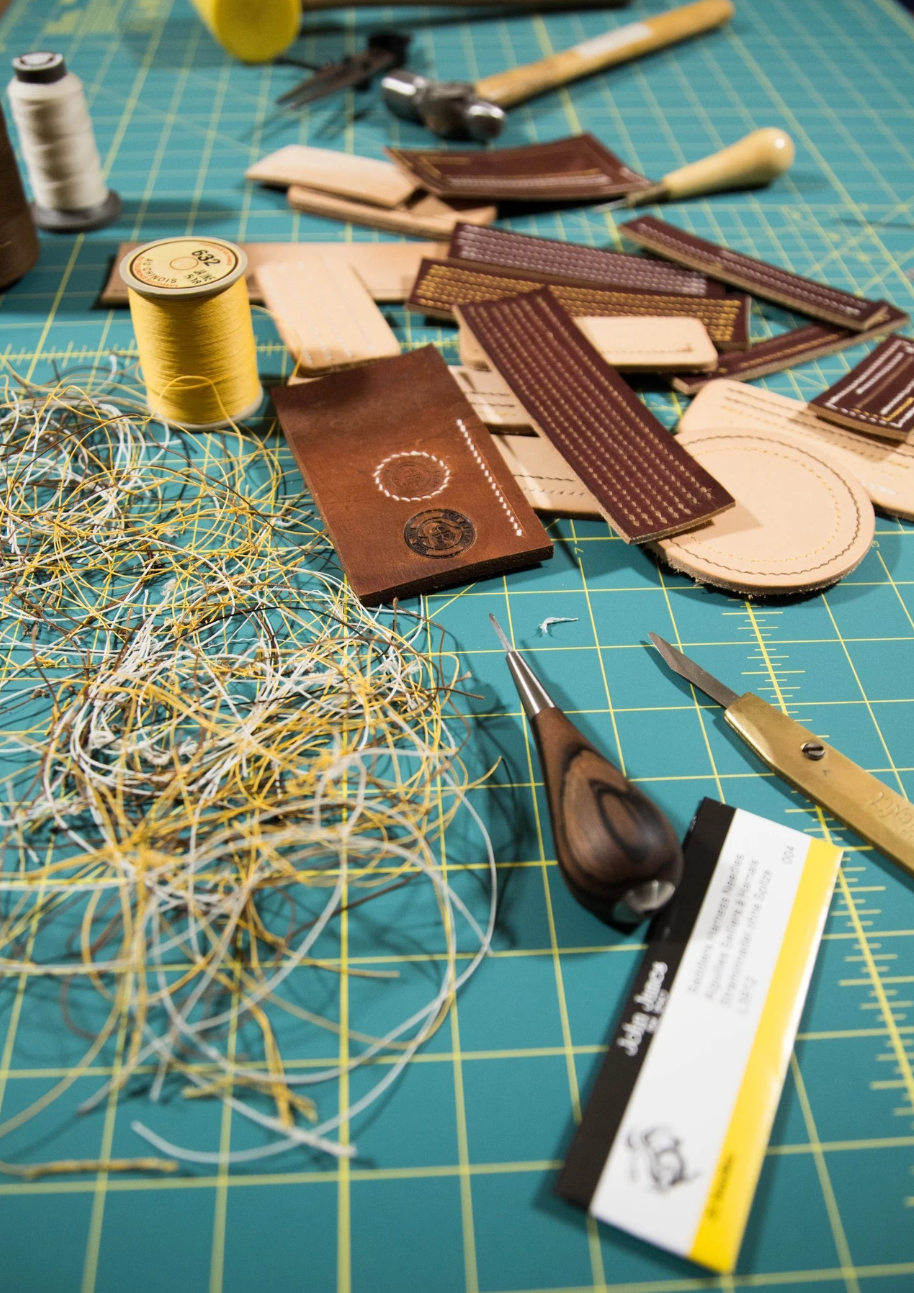
It's quite common for leather workers to include tools, materials, and leather in the same photo as the completed project. This is for good reason.
If you're making handmade items, it makes sense to give the impression of something being crafted by hand. Otherwise, people are naturally going to imagine that your work is machine made. Why wouldn't they?
As a tip, experiment by having some of your tools 'point' towards the leather item you've made. It doesn't always have to be every tool there, but it helps to direct the viewer's eye at the 'hero' of the image. Just something to have fun with, as it creates an interesting scene.


The importance of lighting
Get your lighting right, and it can transform your images like you wouldn't imagine.
Some people believe all you need is an object to be evenly lit from all angles, so nothing is hidden. While this may work in some cases, playing around with light can have dramatic effects on the outcome of your photo.
Take the image below for example. While it is reasonably well lit all around, it has more light coming from the upper right hand side.
This was done on purpose to highlight the shape of the filler in the panels of the bag and the lock 'flap' at the front.
Evenly spread lighting will drown out these subtle shape changes and didn't showcase the bag at its best.
The directional lighting creates shadows and highlights that give an almost 3D look. This helps prevent the image from looking flat.

But, what if you don't have photography lights, or anything bright enough?
Well, there's always the sun! That brilliant, blazing fireball in the sky can outshine anything. Experimenting with natural light at different times of day can also dramatically change your photos.
The photo below was created on a cold day, so a scarf and warm knits were in order. The sun was getting lower in the sky and created some rather nice directional lighting with a warm glow. This is known as 'the golden hour', and can be used to dramatic effect.
The photo also allows the project to be seen in context. The viewer can see how this crossbody bag is meant to be worn. However, I haven't included my face, which enables the viewer to better imagine themself in the photo wearing the bag.
The background is also slightly blurred to keep the eye focused on what I want you to see, but it is clear I am outside in a 'country' setting, even if it is just the bush outside the workshop.

If you’re unsure, experiment by taking multiple shots of the same object from the same angle, adjusting your light source each time (or the project if using the sun). You might end up with a dozen or more images of the same thing, but there will probably be one particular image where the angle of the light just makes the image stand out from the rest.
Over time, you'll get the hang of it and intuitively know what's going to look good, even before you get your camera out.
The power of storytelling
Simply put, any image you take with a camera is a form of communication.
So before deciding to set the scene, think about what you are trying to convey with your message to the world. What story are you trying to tell?
An easy hack is this: Imagine for a second you are an AI image generator. What prompt would you write to yourself in order to arrive at your desired photo? Start there, then create the scene in real life.
To give you an example of how I do this, I will take 3 images from my archive and explain the story I was trying to convey with each.
Whether I succeeded or not is down to you. However, having an idea and an intention can significantly help your audience connect with your photographs.
Image design brief 1:
"After publishing a video course on how to make a doctor's bag handle, I want to create an image that showcases the shape of the handle, highlighting the use of filler. I want the image to show a highly polished edge so that students know I will be showing them how to do this in the video course.
Although it hasn't been made public yet, I want students to get a sneak peek at what the next course is going to be; an actual doctor's bag.
To do this, I am going to include hardware and tools in the background that would usually be seen in the construction of a doctor's bag. A lock, strip steel and brass pins.
The viewer should feel excited and curious, with a sense of 'wait a minute, is there going to be an actual doctor's bag in the next course?'"
Result:

Image design brief 2:
"Create a scene to showcase a new video course teaching students how to make a cigar case.
The image should convey a sense of class, refined taste and an enjoyment of the finer things in life.
Use props in the image that tell this story, such as whiskey, books, cigar paraphernalia etc.
The viewer should feel like they are in a refined cigar lounge about to relax with a good book to the sound of jazz music playing in the background."
Result:
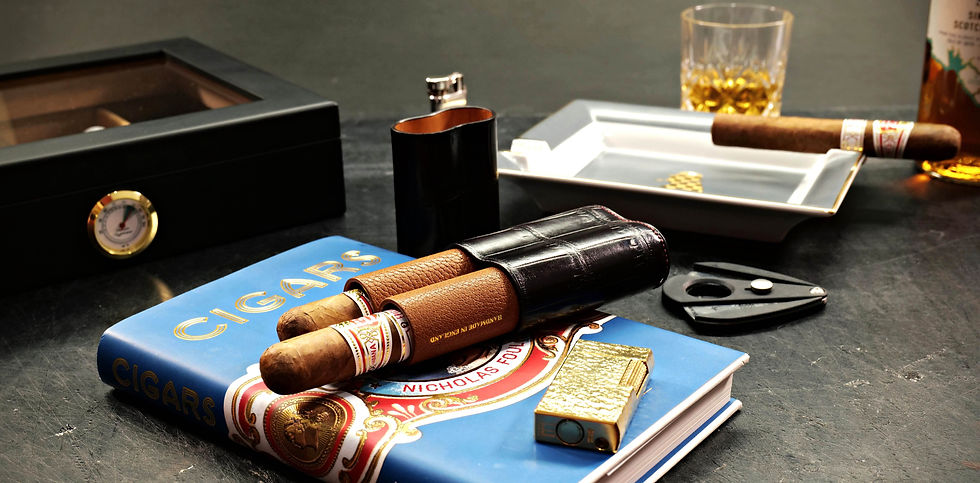
Image design brief 3:
"I want to create a scene that tells a story of travel and adventure. This image should showcase a new video course on how to make a leather one-piece military watch strap.
To do this I will use a luxury 'tool' watch that fits the scene, together with a map and any other items that would complement the adventure story.
The viewer should feel like the creation of this watch strap will be the start of that adventure they've always wanted to go on."
Result:

Editing your masterpiece
Editing is a skill in itself. It's much too involved to fully explore in this blog, but outside of recommending a myriad of YouTube videos created by professional editors, I do have a few tips for you.
#1. FREE is fine. In fact, that's all I ever use. After all these years, I still use PhotoScapeX. It's a 'freemium' editor. However I've never needed any of the premium features that you pay for.
There are other free editors out there, both online and downloadable. They all do the basics just fine. Pick one and get familiar with it by playing around.
#2. Try not to over edit. This one is hard (for me!), because as you incrementally make changes to the colour saturation, white balance, warmth etc, sometimes you can go too far and have an image that just looks plain weird. Because it happens incrementally, you don't always notice it.
This is especially true when using HDR functions that can be cool in some instances, but most of the time it creates an image that looks odd and over edited.
#3. Keep it simple. Make one adjustment at a time and realise less is better. Something I still work on to this day.
Adjust your image to reflect reality, and only get creative with edits as you gain experience.
Remember, most of the leg work should be done before editing, not after. The best photos hardly need any adjustments at all.
#4. Keep it real. Making your work look like something it's not, will not do you any favours. removing every imperfection from your edges so it looks artificially perfect may garner you more 'likes', but if you plan to sell or showcase your work on video, your story of perfection may just unravel.
Remove things you didn't create, such as lint, dust specks and such. If you're worried about imperfections, get it sorted earlier with good lighting and angles. Don't polish a turd, only edit good photos.
Conclusion
So there you have it, the Leathercraft Masterclass photography method explained. You may love or loathe the photos I produce, but the important elements are there. A method behind every photo, and a sense of uniqueness where people can recognise your photos by having a particular feel they associate with your work.
Do you have any tips or questions about leathercraft photography? Share your thoughts in the comments below!
Thank you for reading.
Philip


Good blog post Phil. I’ve found one easy win in product (or any) photography is to explore the height and point of view of a photo. 99% of photos are taken from a standing position, but the best view of your product might be from down at table height, or below it, or even from above.