How To Wrap A Skiving Knife Handle In Leather
- Leathercraft Masterclass
- May 18
- 4 min read
While some skiving knives come with wooden handles, my favourite kind is simply made from a flat steel blank.
These thin skiving knives tend to have the ability to get nice and low in order to make the thinnest and most precise cuts without needing to place a thick bulky handle off the edge of your paring stone, and potentially losing some precision.
However, there's a trade off. These flat knives don't feel comfortable in the hand, and there's not much to grip outside of a thin metal edge. After a while, the fingers can get tired, or even slip in hot weather.
But, there is a solution..
In this blog post, allow me to guide you through the process of how I wrap the handles on all my skiving knives. These wraps are not only comfortable, but they allow you to practice precision, through the use of a technique known as an overlap skive.
The outcome can be quite beautiful, showing no finished edges and magically obscuring the eye from where the wrap starts or ends.
Step 1.
First, you need a skiving knife (it definitely helps), and you'll want to place down 3-4 pieces of masking tape over the business end of it. The tape will provide some protection over the blade to help prevent accidents, but always act as if it's not there. It's a backup, not a preventative.

Step 2.
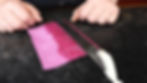
Find some thin leather. I like softer skins such as goatskin which are more comfortable, but use what you have.
You can go as thin as you want, but going too thick will be more challenging to wrap.
I'm using 0.8mm skin here, but I wouldn't venture too much beyond 1.2mm (2-3 oz)

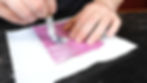
Step 3.
Cut a rectangle long enough to cover the area where you normally hold your knife, and wide enough to wrap around the handle while still having 1/2'' to 1" of excess which we will trim later.

Step 4.
On the flesh side, mark a straight line along one edge.
5mm, plus the thickness of the knife. So let's say your knife is 2mm thick, that would be 7mm in from the edge.


Step 5.
At this point, skive the leather edge along that side from the marked line down to the edge. Create an edge as fine as possible without cutting through to the grain layer.

Step 6.
Take some PVA Glue (white, Elmers etc) on a brush, and apply from the middle out to the skived edge.
Step 7.
Clean the metal parts to be wrapped using alcohol or a similar cleaning solvent.

Step 8.
Place one side of your knife handle against the line you drew. If you wait a few minutes for the glue to become sticky (right before it dries), this part is easier.

Step 9.
Take a bone folder and lift up the skived edge along the knife handle area, then begin to fold over.
Finish of by pressing the leather over the edge with a clean finger.


Step 10.
Lift the knife up and back over itself so that the leather is now wrapped around the handle fully.

Step 11.
Using the edge of the now wrapped handle, run a fine pen down the side of the knife to mark a trim line. Once done, open the knife back up again and allow the glue to dry.

Step 12.
Once fully dried, take an abrasive pad or paper and roughen the grain side of the skived edge. Stop about 1.5mm from the very edge leaving some of the grain layer intact.

Step 13.
Take a ruler and trim away the excess leather using the line you drew as a guide.

Step 14.
At this point, fold the leather over and see how much more you need to trim off. You want the edge to terminate where we stopped roughening earlier with the sanding pad (1.5mm back from the handle edge).
Trim very small amounts at a time until you have a perfect match.


Step 15.
Next, measure the width of the roughed area on your first skive (up to the 1.5mm of grain layer we left). It should be around 3-4mm. Take an average by measuring along the length of the handle wrap.

Step 16.
Whatever your measurement is, transfer this using a pen and a ruler to the opposite side of the handle wrap.

Step 17.
Skive this area too. Again, the very edge of the leather should be fine and sharp so that our two overlapping skives blend seamlessly later on.

Step 18.
Re-apply PVA glue on the flesh side.

Step 19.
Use your bone folder to work the leather around the corner tightly. Once you're over the corner, switch to fingers and make sure your two overlapped skives are level and even.


Step 20.
The resulting join should be hard to see. In the closeup below, you can see the join if you look closely. There are some white crumbs of glue that need wiping off that show where the join is.

Step 21.
As this is a knife will take hard use for years, it is wise to press the fine edge of the skive below the leather's surface to prevent it from catching on anything.
To do this, wait for the glue to fully dry, then run a hot creaser along the side, pushing the fine edge into a crease below the surface.
For best results, do this on all edges of the knife, making the join virtually invisible.

Step 22.
Lastly, if you have a leather surface finish, it's extra insurance to apply a layer over the whole wrap.
Here I'm using Bag Kote. Acrylic Resolene will do the same, though it is more shiny and less breathable for when hands are hot in summer.

Step 23.
Step back and admire your work!
This is a great project to use up scrap pieces of leather, you can even use exotic skins as well as your standard hides.

If you would like to see this as a video course, check out 'How To Wrap Tool Handles In Leather' which is available as part of a Plan membership (with 6, 9 or 12 month access options) that opens up this, and well over 100 full length leathercraft videos.
Check the preview below: